Showing posts with label Tutorials. Show all posts

Thursday, April 14, 2016

Max Fabric Stretch for Doll & Softie Making? Which one is right?

❤ I'm often asked about Fabric Stretch .. do I line my dolls or softies - answer - nope - even with super stretchy fleece - Nope -  however I'm always aware of fabric stretch ... are you?

❤ Amazing the different look you'll get if you cut your pattern out with the Max Stretch one way rather than the other - is one right or wrong?! Which do you prefer - Owl A .. or Owl B?

❤ Here's a quick Fabric Stretch Tutorial for you all ❤ 
 Happy Sewing from Sarah

Friday, September 18, 2015

Tuesday, February 25, 2014

Embroidery Machine In The Hoop Toy Patterns FAQ

Bunny Rabbit Embroidery Machine ITH Sewing Pattern

Fabrics I LOVE for my ITH Softies

Body
I love Rose (or sometimes it's called Swirl) Minky! Super soft and snugly!
... you can also use low pile fleece, terry cloth and cotton.
If your machine is good with multi layers of thickness you can also use a low pile faux fur.

Inner ears
Always use cotton unless you know your machine does well with multi layers of fabric.

Limbs
Cotton or fleece

Face
Wool Felt – not craft! Craft will go patchy and bobbly with lots of kisses and that's no fun :(
Fleece - Can't find felt, try Anti pill fleece is super soft and won't fray :)

Tummy Inlays
Wool Felt and Fleece don’t fray - Hooray!
Cotton – woven – always use a heat n bond backing to stop fraying or the Diamond Stitch files.

ITH Monkey Embroidery Machine Pattern

Adding Cotton Tummies to your ITH Softies

This is fun and easy and once you have made a couple you’ll fly through it :)

Always back your cotton fabric with a piece of Heat n Bond before you attempt to embroider it onto the tummy. It’s an iron on interfacing that holds the woven threads together and thus stops fraying. I am sure other brands out there work I just like this one

I usually use ‘light’ heat n bond, mainly because it allows the cotton to stay supple .. but the ‘permanent heavy’ kind works well too … especially if you cotton is a low thread count and frays easily.

When you cut around the cotton on the tummy you must leave at least a 1/8 inch seam allowance away from the stitches. If you cut the cotton close to the stitches it will fray or just come off, and that’s no fun.

If the light heat n bond isn't working for you you could always try the permanent one. I also like to iron it onto some felt before adding it to the tummy, that way it is sealed from both sides and is nice and stable.
If you follow this method your tummy will not fray :)

I love using this method in my sewing patterns also, please feel free to check it out for a step by step photo tutorial.


How to Rescue your tummy fabric if you forgot to use Heat n Bond – As long as you left a good seam allowance (1/8 – ¼ inch you should be able to use this method). Grab your fray check and seal around the edges. Wait till it dries and then continue on with your stitching.

Key Points in remember – Iron on Interfacing  and always cut a 1/8 – 1/4 inch seam allowance.

Mice Embroidery Machine ITH Pattern

NEW Diamond Stitch for Tummies 

Now all of my cotton tummies and hair come with a Diamond Stitch option! 
As a toy designer I love light looking stitches like the Diamond, the heavier ones, like the Satin Stitch, not only add 1/2 an hour or more to the making of the toy but they often detract from the over all unique design.

PLUS Diamond Stitch is not scratchy!  Hooray so it will keep your new stuffie super soft and snugly for your little one ♥

Hedgehog Family!

Turning and Stuffing Tiny Limbs

I love hemostats for turning! It makes turning small parts like limbs, and big fluffy friends a breeze! Go here for a full tutorial.

love these

When stuffing – don’t over stuff your limbs, keep them squishy and always leave a ¼ - ½ inch gap at the top. This will make sewing around your softie sandwich a breeze!

If you are worried grab your painters tape and tape them down before you add the back piece.


Stuffing Bodies 

Tools.
An old paintbrush or chopstick works wonderfully - the bristles grab the stuffing and helps you get it into all the corners.

Technique.
Always pull apart your stuffing before you use it. Then add small bits at a time and compact them down/place them using your chopstick or paintbrush.

What stuffing to use?
Poly-Fil (synthetic) is relatively cheap and easy to come by. It will give your doll or Softie a cute plump fluffy look, you’ll have to work a bit to get the wrinkles out of the head and neck area but it holds up well.  Careful to fill all the 'holes', they can reappear down the road.

Don't Stuff the ears!!  Hahaha they will look kinda silly ;)

Also I recommend using fleece for your 4x4 stuffies limbs and don't stuff them .. the fleece will make them look cute and chunky but it will be so much easier to turn!
Little Lamb Softies

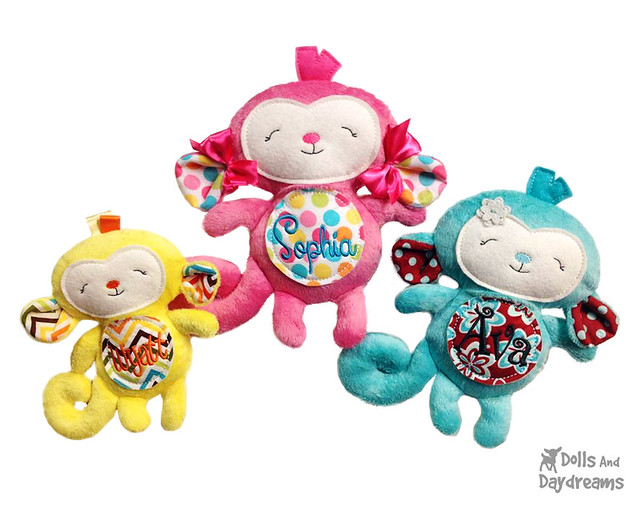
Customize your Softies!

Embroider your child’s name, initials or date of birth onto their tummy fabric (fonts are not included in the patterns).  Have fun being creative!

I recommend adding your Monogram/Font just before you add your limbs :)

How to: You will need software or a machine that has the ability to merge designs.

Can't do that?  Embroidering the name/letter onto fabric before beginning and simply position it straight over the tummy placement stitch when they get to that step ;)  It's a good idea to create one first in your desired size so you can measure the tummy area ;)


All of my Digitized Doll faces copy 


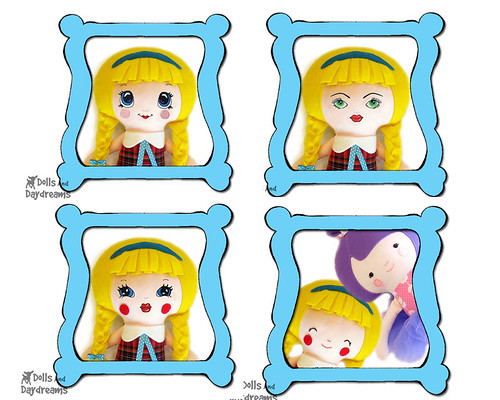
Adding a different Faces:
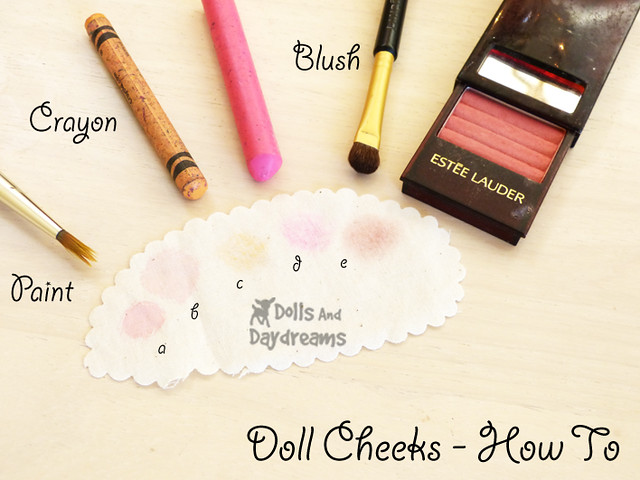
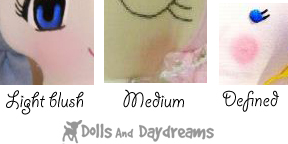
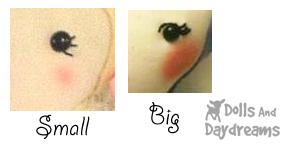
   Tips for minimal puckering on machine embroidered faces.  If you are embroidering only the face fabric and are going to sew the doll by hand I suggest hooping your face fabric with the stabilizer. I use mesh cutaway for the stabilizer I hooped. Then I used temporary adhesive to put down the face fabric, smooth it out really well and keep smoothing it as it stitches it in place. Then when I got to embroidering the face, I floated a double piece (one piece folded over) of heavier tear away under the hoop (just tape it in place on the underside of the mesh stabilizer). Tear away that stabilizer after the face is done embroidering. Then after the doll is all finished and stuffed nice and firm, use your iron and steamed out the remaining wrinkles. She will look flawless.


Easter Bunny Love!

Hoop Sizes

Please use design files as sent, I cannot guarantee the quality of the design if you alter, resize, or reformat the design in any way.

Available Formats

PES, VIP, XXX, HUS, JEF, EXP and DST

If you own a machine that does not work with these formats you can download free conversion software to convert your files at this website: http://www.wingsxp.com/index.php/my_editor/ If you are using a Bernina Embroidery machine and can only use .art format you will need the appropriate Bernina software to convert to .art format.

Transferring Files

You MUST have an embroidery machine to work with these files and a way to transfer the files from your computer to your embroidery machine.

New to ITH?

Due to the number of different types of machines and models out there I suggest reading your user’s manual for transferring files over, contacting your dealer or find a friendly ITH forum and see if someone else has the same machine as you.

Can’t find your Step by Step Photo Tutorial?

The PDF Tutorial is inside the zip file.

  • Adobe Reader is required to view and print your pattern. Find it for Free here: http://get.adobe.com/reader/
  • Mac users please open your PDF Patterns up directly in Adobe Reader and NOT Apple’s default PDF reader called Preview.

If you still aren't seeing it, try downloading again and wait until it has finished downloading before you click on it to open it up :)

Can’t find your file type?

Can't find it in the zip file?  Make sure any new software you have recently installed isn’t making the file format you are looking for in the zip folder ‘disappear’. If you don’t see it, check a known file you have used before and see if you can view it there too. If you can’t … it’s most likely a software conflict.

Hoop Size not working?

Please make sure that the orientation of your hoop is set up correctly. It might be height by width instead of width by height, try rotating it in software


 Happy Sewing from Sarah

Friday, October 18, 2013

Free Charity Easy Rag Doll Sewing Pattern - Small 10 & 8 inch dollies


I love knowing a dolly is in the hands of a child in need, my Dolly Donations Blog means so much to me!   I've had the pleasure of working with lots of lovely ladies all around the world donating Dolls made with my original Free Charity Dolly Donations Doll Sewing Pattern.  This year I was asked to design a smaller version of my original Dolly for donating to Operation Christmas Child. ....  SO please meet my Free Mini Dolly Donations doll patterns!!!

No re-sizing needed simply click and Download the New Mini Pattern HERE!

We're making 200 for OCC & Need Your Help!

Please let all your Sewing Friends Know! 

Pop over to my Dolly Donations Blog for more info!!! 


My lovely friend Karin From Australia is working with OCC this year too and had great fun sewing up the NEW Mini Charity Doll Sewing Pattern for her boxes, and now you can too!!

"I am currently doing some volunteering at OCC - they insist that every box has "something to love" and it is the single thing that kids will refer to as their favourite bit of the box. I don't think I have to tell you about the power of dolly love!!!" Karin

If you would like to help please grab My Mini Dolly Donations Free Doll Sewing Pattern and sew up a few!

Please note:  This is a Free Charity Pattern (Copyright Sarah Hanson 2013)
Please don't sell your dolls made from this pattern ...  Please give them to a child in need!


My Dolls And Daydreams Small dolls & Softies fit perfectly into boxes too :) 

Some of Karin's tiny tots for her OCC boxes this year.
Karin's favorites are Tiny Tot Dolls and my Big Boy Dino pattern reduced by 50% CUTE!
The lovely Karin who stitched up the dolly above has been donating to OCC too, and sent me these wonderful photos.

Karin reduced the Big Boy Dino down by 50% .. aww looks like Mummy & Baby!
She reduced my Big Boy Dino pattern by 50% , and simply sewed it up using the pattern as is with no seam allowance added.

Christmas is just around the corner!  
Let's make a little one smile!
 Happy Sewing from Sarah

Saturday, July 27, 2013

I LOVE Hemostats for Doll & Softie Making!

love these

Hemostats look like big tweezers with the handle ends of scissors attached to them.  They are not sharp .. or used for cutting, they are used for gripping .. and they even have a lock on the handle so you can wiggle and pull without worrying that you'll let go of your fabric.  


Hemostats turning dolls softies limbs tutorial 

I love them for doll making.

1) They are brilliant for turning little limbs - well they are brilliant and fast for turning anything the right way! Those long handles can really get down a doll leg!! 

2) They are great for firmly positioning stuffed body parts together :) like necks and head.

You can get them with straight ends or curved ends ..... Both are fabulous and I use them daily.  In fact I have been using them for years. 


So why have I not mentioned them before?  Well they were not that easy to come by ....   BUT thanks to the internet they are now and they are supper cheep!  Hooray!  I brought this pair recently when hubby 'borrowed' my other pair for a project in the garage ... gerrrrrrr ... don't get me started ..... and they have been brilliant!   So I thought I'd share :)

How to use them.

Easy and Fast!

Hemostats turning dolls softies limbs  4 copy

Put the Hemostats all the way in (back arrow) to your softie/dolly opening and grab the furthest seam with the ends.  Make sure you get the tips well over your stitches (red arrow) ... this will make sure you won't damage your stitches or seam when pulling the softie the right way.

Hemostats turning dolls softies limbs  3

Now gently pull the fabric out through the opening (black arrow) ... WOW that was fast!

Hemostats turning dolls softies limbs  1

For little limbs, and small curves the Curved Hemostats are fab!  Pop them in, grab the end and wiggle the fabric to get it going ......

Hemostats turning dolls softies limbs  2 copy

POP! Out is comes!!!! 


Tips


  • Always check on a scrap piece of fabric if the 'locked' handles will damage the fabric ....  sometimes it's just best to hold your Hemostats and not lock them :)
  • Do not lock the handle and just Tug on the fabric ... you could rip it.  Gently pull and wiggle to get it started.
  • Be aware of what you are grabbing hold of ..... on the inside .....  you don't want to rip off a cute applique by accident! 
  • Brilliant for turning Faux Fur too .. but make sure you have the fabric not just the hair in your Hemostats otherwise you'll just end up ripping out the hair ... and no one likes a bald patch! 


Conclusion ....... Hemostats are fabulous!
Here's were you can find your own pair :) http://www.amazon.com/SE-Forceps-Straight-Curved-Pieces/dp/B000W22O3W/ref=pd_sim_hi_1
I was not payed to do this or know or am associated in any way with the owner/seller etc of these I just wanted to share and help others create dollies like mine :) 
 Happy Sewing from Sarah

Tuesday, May 28, 2013

How to make Doll Cheeks - Free Tutorial


Watch the 2019 - updated video tutorial!!! 5 Methods!!! Hooray!
Quickly Learn 5 Easy Methods using Pastels, Wax Crayons, Fabric Marker Pens, Acrylic Paint, and Blusher (makeup). Whether you like a bold Kawaii Cute look or a soft Art Doll one, there's a technique for you!
----------------

Want to know how to get that soft cheek look for your dolls and softies? Well look no further, I'm about to show you!  I'm always being asked how to do this via e-mail and facebook I thought it was about time I wrote it up for the blog! Hooray!

You can achieve this look using either one of these 3 methods:

.... with all of these methods I suggest you do a test cheek or two on some scrap first! 

How to make doll cheeks
1) Fabric Paint - with a soft real hair brush (like one used for water coloring) dilute your fabric paint with water.  Sample (a) was the tip of my brush in the fabric paint added to 2 big drops of water, Sample (b)  was two times as much water.  Same color, but see how softer it looks.  If you paint it on and it looks two soft .. add another layer when it's dry.

2) Crayons - yup, raid your kids coloring draw and nab those Peaches - Sample (c) and Pinks - Sample (d).  With a light pressure and using a circular motion color your fabric creating your cheek.  Layer the color on until it builds up otherwise it will look waxy and patchy.

3) Blusher - remember those free samples you thought you'd keep .. well now you can dedicate them to dolly!!!  Use an eye shadow brush, blow the excess blush off of it and lightly brush the rest onto your fabric.  Again ... layer the blush on, build up the color until you create the cheek you are after.


Different Looks


You can achieve a different look using a different color.  Pinks tones, Brown Tones and Peach Tones all look very pretty!


blush amount for cheeks a

You can achieve a different look with the amount of cheek color you add.  Soft and light hints at a cheek, medium looks like a natural glow, and define looks rosy!


size of cheek 1 copy

And last but not least, you can achieve a different look with the size of the cheek you make!


FAQ

When should I pop my cheeks on my dolly?

I recommend you create your face BEFORE you sew up your doll until you are used to these methods  .. that way if you make a mistake or they look like your 3 year old got a hold of it (it happens to the best of us don't worry!) .. you won't have to scrap your whole doll ... just simply re-do your face!

Why do my cheeks look different on this softie compared to my doll?

Remember - the color of your cheeks will change with the color of your face fabric - always test first!

Can I wash the doll now?

If you set your fabric paint (following the manufactures instruction) you should be able to hand wash & spot clean.  I would suggest only spot cleaning for the last two methods.

What makes do you use?

I find that the better a Fabric Paint/Crayon/make up is to do it's 'normal job .. the better it will be for this one too! 

Do you have some examples?

Yes I do! 
Take a look below at some of the wonderful dolls created by the Dolls And Daydreams community!!

Sewsies World by Jayne Maxwell 2

I picked my Ballerina Doll Sewing Pattern to show you how different dolls look by altering just a few features and yet still using the same doll pattern.

I love using cute felt cheeks but why not change it up, it's easier than you think!  Sewsies World by Jayne Maxwell Christmas Ballerina above has that lovely warm glow in her cheeks!  

Paper Parasol

Handmade with love by Paper Parasol


Titches and Stitches

Handmade with love by Titches and Stitches

my tiny wardrobe

----------------

Carousels and Candy Floss

Handmade with love by Carousels and Candy Floss

how to make blush cheeks on your doll Cheriee

Handmade with love by Cheriee


Mrs h makes

Handmade with love by Mrs h makes

BubbaBows

Handmade with love by BubbaBows

Related Posts with Thumbnails